
Ryoko WLAN Benutzerhandbuch
👋 Hallo! Unser Team freut sich, eine Kurzanleitung zur Nutzung von Ryoko mobiles WLAN anbieten zu können. Klicken Sie auf eines der Themen.
Gerät Einrichten Verwendung zusätzlicher Funktionen Rücksetzen auf WerkseinstellungenGerät Einrichten
-
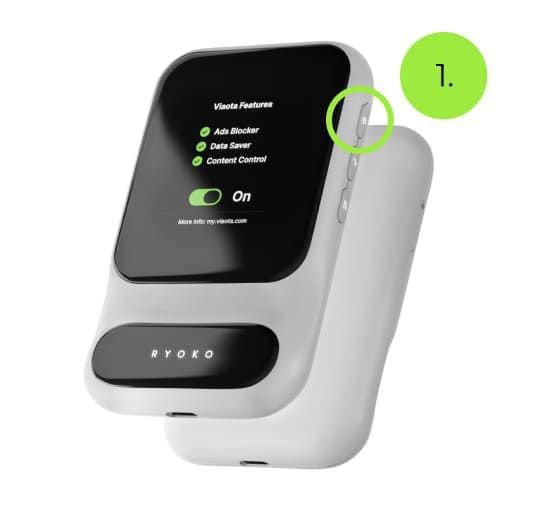
Schalten Sie das Ryoko ein, indem Sie die Einschalttaste oben rechts am Gerät gedrückt halten, bis das Display aufleuchtet.
Wenn sich das Gerät nicht einschalten lässt, laden Sie es zunächst mit einem USB-C-Kabel auf (im Lieferumfang enthalten). Schließen Sie das Kabel an den USB-C-Anschluss an der Unterseite des Ryoko-Geräts an, um den Ladevorgang zu starten.

-
Sobald Ryoko eingeschaltet ist, wählen Sie den bequemsten Verbindungsweg:
-
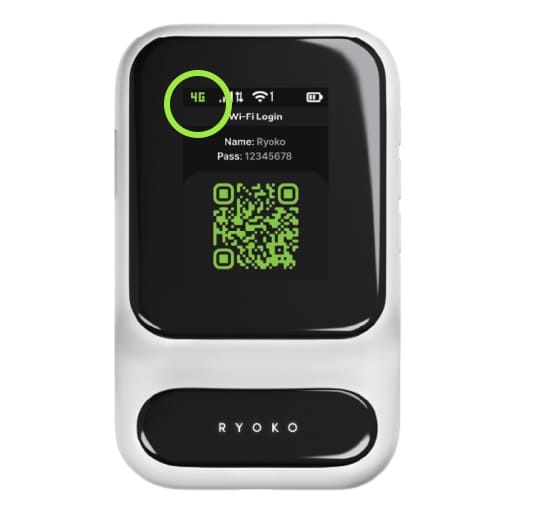
Automatisch verbinden durch scannen des QR-Codes
-
Oder die Verbindung manuell mit dem WLAN-Namen und -Passwort herstellen. Sowohl der QR-Code als auch die WLAN-Details werden auf dem Ryoko-Display angezeigt.
-
-
Sie können anschließen; Ihr Telefon, Laptop oder ein anderes WLAN-fähiges Gerät. Sie können bis zu 10 Geräte gleichzeitig verbinden.
-
Das war es! Sobald Sie eine Verbindung zu Ryoko, hergestellt haben, können Sie die Signalstärke, die Anzahl der verbundenen Geräte und den Akkustand oben auf dem Ryoko-Bildschirm prüfen.
Verwendung zusätzlicher Funktionen
-
Ryoko wird mit einer vorinstallierten SIM-Karte von Viaota ausgeliefert, die zusätzliche Vorteile bietet.
Dazu gehört Überwachung Ihrer Datennutzung direkt auf dem Display des Geräts und die automatische Blockierung von Werbung. Diese Funktionen sind nicht mit einer SIM-Karte eines Drittanbieters verfügbar, sondern nur mit der SIM-Karte von Viaota.
-
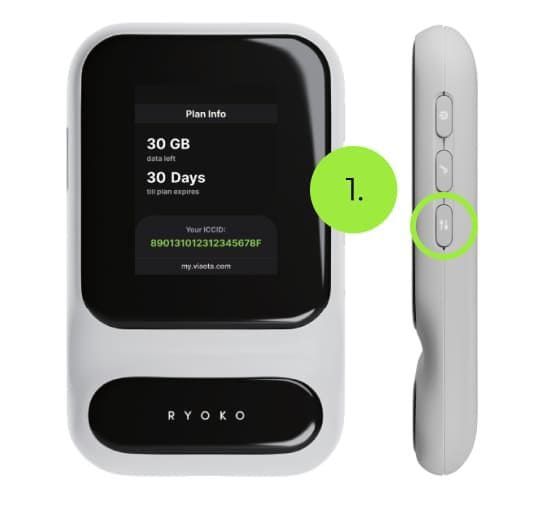
Überwachung des Datenverbrauchs: Klicken Sie einmal auf die Menütaste, um zu sehen, wieviel Daten Sie noch zur Verfügung haben.
Diese Taste führt zum Display Info. Wenn Ryoko mit dem Internet verbunden ist, wird die verbleibende Datenmenge angezeigt.
Unten auf dem Display sehen Sie den Link zum Selbstbedienungsportal von Viaota und die ICCID der SIM-Karte, damit Sie diese einfach im Portal verwalten können.
-
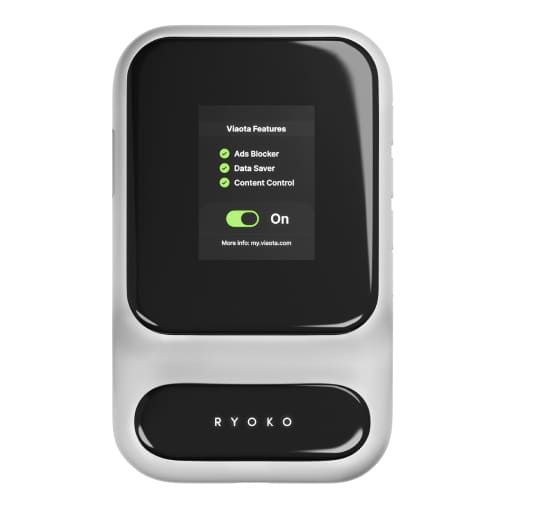
Automatische Blockierung von Werbung aktivieren: Viaota kann Ihnen helfen, sicher online zu bleiben, indem Werbung, Tracker, Malware und Phishing blockiert werden. Um diese Funktion zu aktivieren, gehen Sie wie folgt vor:
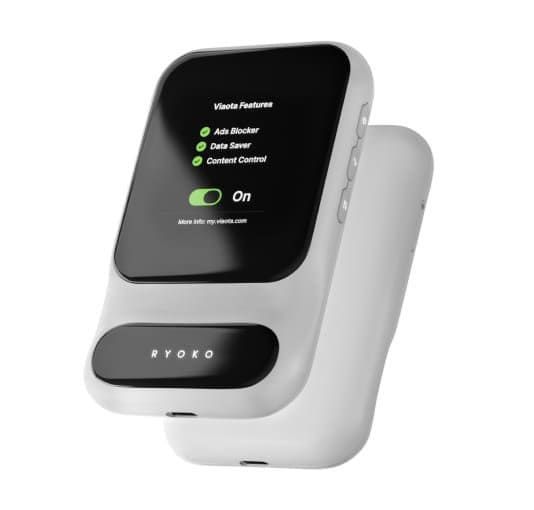
1. Klicken Sie erneut auf die Menütaste. Dadurch gelangen Sie in das Fenster Viaota-Funktionen, in dem Sie einen Umschalter sehen. Der Umschalter zeigt an, ob die Funktion ein- oder ausgeschaltet ist.

-
2. Klicken Sie auf die Schaltfläche mit dem Häkchen an der Seite Ihres Ryoko, um die Funktion zu aktivieren oder zu deaktivieren.
Anmerkung: Der automatische Werbeschutz blockiert Netzwerkanfragen an bekannte Werbenetzwerke oder bösartige Websites. Wenn Sie Verbindungsprobleme mit vertrauenswürdigen Websites haben, deaktivieren Sie diese Funktion und versuchen Sie es erneut.
Rücksetzen auf Werkseinstellungen


Falls Ryoko nicht wie erwartet funktioniert, können Sie es auf zwei Arten zurücksetzen:
Drücken Sie die Taste Power und halten Sie diese ca. 10 Sekunden gedrückt.
Nachdem die Ein/Aus-Taste ca. 5 Sekunden lang gedrückt wurde, leuchtet das Display auf und zeigt die Aus-Meldung an. Nach weiteren 5 Sekunden leuchtet das Display wieder auf und zeigt das Ryoko Logo. Dies zeigt an, dass Ryoko erfolgreich neu gestartet wurde.
Nur für fortgeschrittene Benutzer:
Falls Sie Ryoko auf die Werkseinstellungen zurücksetzen müssen: Melden Sie sich auf der Webverwaltung an.Stellen Sie sicher, dass die Netzwerkverbindung zwischen Ihrer Ryoko und dem Gerät, mit dem Sie sich auf der Webverwaltung anmelden möchten, hergestellt ist - das Gerät ist über WLAN mit der Ryoko verbunden.
Geben Sie http://192.168.0.1 in die Adresszeile eines Browsers ein. Geben Sie den Benutzernamen und das Passwort ein, um sich auf der Webverwaltung anzumelden (Benutzername und Passwort sind standardmäßig „admin“).
Nach dem Einloggen gehen Sie zu Einstellungen, das Sie im Menü auf der linken Seite finden. Klicken Sie dann auf Geräteeinstellungen und Zurücksetzen. Hier sehen Sie das Display Werkseinstellungen. Um das Gerät auf Werkseinstellungen zurückzusetzen, klicken Sie auf die Schaltfläche Zurücksetzen.


Ihre Cookie-Einstellungen
Cookies und ähnliche Technologien helfen uns, Ihre Erfahrung zu verbessern, die Performance der Website zu analysieren und personalisierte Inhalte und Werbeanzeigen über unsere Analyse- und Werbepartner bereitzustellen. Um mehr zu erfahren, lesen Sie unsere Cookie-Richtlinie
Sie haben die Kontrolle. Sie können wählen, welche Cookies Sie zulassen, und uns verbieten, Ihre personenbezogenen Daten freizugeben oder zu verkaufen: